
Container technology, which creates consistent environments and streamlines deployment processes, is incredibly beneficial for software development. Containers contribute to faster development cycles, more efficient resource utilization, and greater flexibility in application management.
Some of that efficiency can be lost, though, if organizations reinvent the wheel with each software development project. Instead, a base image should serve as the starting point for building other container images. These base images contain a bare minimum OS, essential tools, ensured compatibility, reduced image size, and other advantages.
While base images provide a lot of value, they do have risks. It’s easy for your application to be compromised due to:
- Large attack surface: Base images may include extraneous packages, which could increase the attack surface.
- Unmanaged dependencies: Many dependencies in container images are not frequently updated and can be filled with vulnerabilities.
- Severe and unknown vulnerabilities: There’s a high risk of severe and unknown vulnerabilities present in a base image, even in known public registries.
- Misconfiguration: Base images may be misconfigured or contain a standard configuration that contains hard-coded secrets and can lead to unauthorized access.
GitLab and Chainguard provide several solutions to address these risks, including Hardened Base Images, Container Signing, and Vulnerability Scanning and Management. In this article, you’ll learn how these features can be implemented to prevent breaches via containerized applications.
Chainguard’s minimal, hardened container images with low-to-no CVEs
Chainguard Images offer several key benefits that make them essential for organizations prioritizing security:
- Low-to-no vulnerabilities (out of the box and Day Two): Chainguard images are the product of a Linux distro and toolchain purposely built from the ground up to distribute patched open source software fast.
- Reduced attack surface: Hardened images remove unnecessary components, libraries, and tools, significantly reducing potential entry points for attackers. This minimization of the attack surface makes it more difficult for malicious actors to exploit vulnerabilities.
- Improved compliance: Many industries have strict security regulations. Hardened images, especially those designed to meet FIPS hardening standards and to include a security technical implementation guide, or STIG, help organizations meet compliance requirements like FedRAMP, PCI-DSS, etc., by adhering to security best practices and standards.
- Enhanced runtime security: Properly hardened images are less likely to be compromised during runtime, providing better protection for the applications and data they contain.
- Increased operational efficiency: Minimal images are typically smaller in size, leading to faster deployment times and reduced resource consumption.
Chainguard provides more than 833 minimal, hardened images that can be easily built, shipped, and run. Container images can all be stored and managed directly in GitLab Container Registry. These solutions greatly minimize container security complexity.
Chainguard image library
The Chainguard directory provides hardened, minimal container images to help developers build software from the onset. With 97.6% fewer vulnerabilities than the average image, Chainguard Images help organizations swiftly reach container security compliance goals like NIST 800-53, FedRAMP, or PCI-DSS.
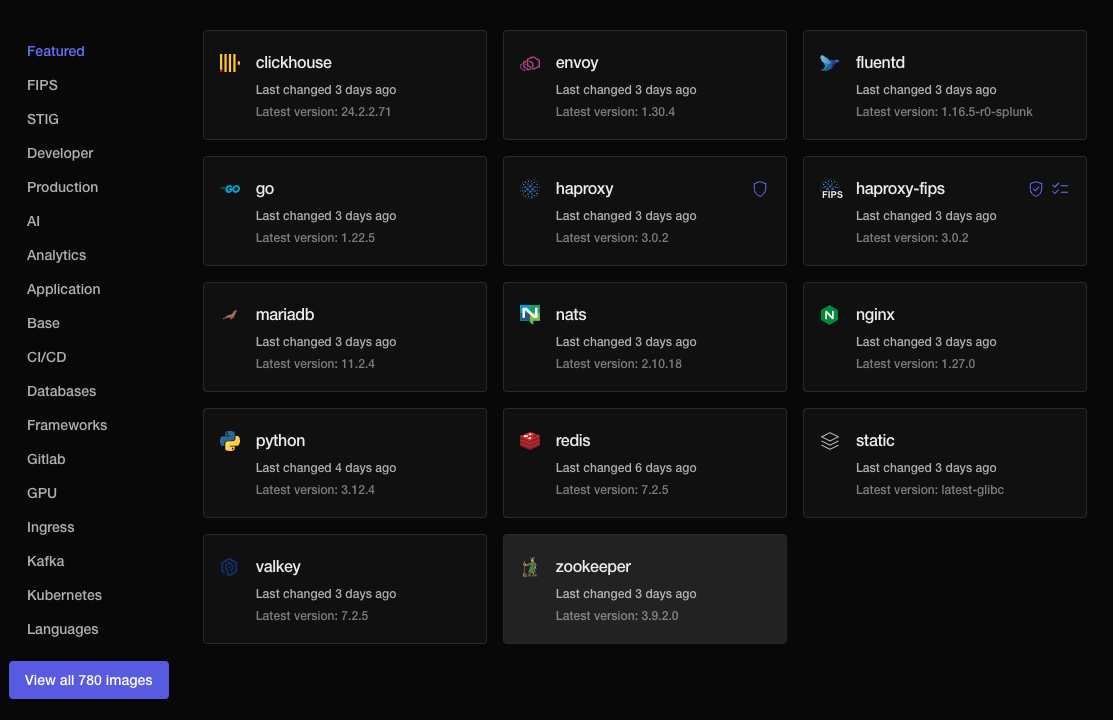
<center><i>Chainguard minimal, hardened container images featured section</i></center>
<p></p>
These images can be accessed directly from the Chainguard Directory. All images have the following features:
- Build time-generated software bill of materials
- Sigstore-powered attestation and provenance
- No vulnerabilities
- Security advisory feed in SecDB and OSV formats
Using Chainguard container images in GitLab
Chainguard container images can be used in the following ways:
- directly within GitLab to run jobs within a pipeline
- stored in a Dockerfile in GitLab, which can be created, scanned for vulnerabilities, and pushed directly to the built-in container registry
Using Chainguard images in a GitLab job
To use a Chainguard image in a specific GitLab job, within your gitlab-ci.yml, simply set the image directive under the job definition to the image you wish to use. For example, the following job named unit-tests uses cgr.dev/chainguard/go:latest as the container image to run the job.
stages:
  - test

unit-tests:
  image: cgr.dev/chainguard/go:latest
  stage: test
  before_script:
    - go mod download
  script:
    - go test -coverprofile=coverage.out
  artifacts:
    paths:
      - coverage.out
Using Chainguard images in a Dockerfile
To use a Chainguard image within a Dockerfile, simply create a Dockerfile in the root directory of your GitLab project. Then set the base image of the Dockerfile to the Chainguard image you wish to use, and add any other required commands:
FROM cgr.dev/chainguard/go:latest

WORKDIR /app
COPY . .

RUN go mod download
RUN go build -o /main .

CMD [“/main”]
Then, you can create a job in the .gitlab-ci.yml to log in to the built-in GitLab Container Registry and push the image:
build-app-image:
  stage: build
  image: docker:latest
  services:
    - docker:dind
  variables:
    IMAGE: $CI_REGISTRY_IMAGE/$CI_DEFAULT_BRANCH:latest
  before_script:
    - docker login -u $CI_REGISTRY_USER -p $CI_REGISTRY_PASSWORD $CI_REGISTRY
  script:
    - docker build -t $IMAGE .
    - docker push $IMAGE
Once the job completes, you can see the pushed images in GitLab Container Registry by selecting Deploy > Container Registry from your project’s side tab.

<center><i>GitLab Container Registry</i></center>
<p></p>
Note: GitLab makes it easy to authenticate with the built-in container registry via reserved CI/CD variables as seen above.
Container image signing
Signing container images is a critical security measure to prevent tampering by verifying their authenticity, trust, and integrity:
- Authenticity: Ensures the source of the image is trusted by verifying the signature attached to an image with the public key from a trusted certificate authority.
- Trust: Image publishers and users can trust each other, allowing frequent image sharing.
- Integrity: The signature includes a hash that can be checked to ensure the image has not been altered since the signing.
The Sigstore project provides a CLI called Cosign, which can be used for keyless signing of container images. This eliminates the need to manage safeguards and rotate the private key that will be signing the image. GitLab provides container-signing by allowing you to generate a private key via a token obtained from the GitLab server using the OIDC identity of the user who ran the job. The token includes unique claims that certify that a CI/CD pipeline generated the token.
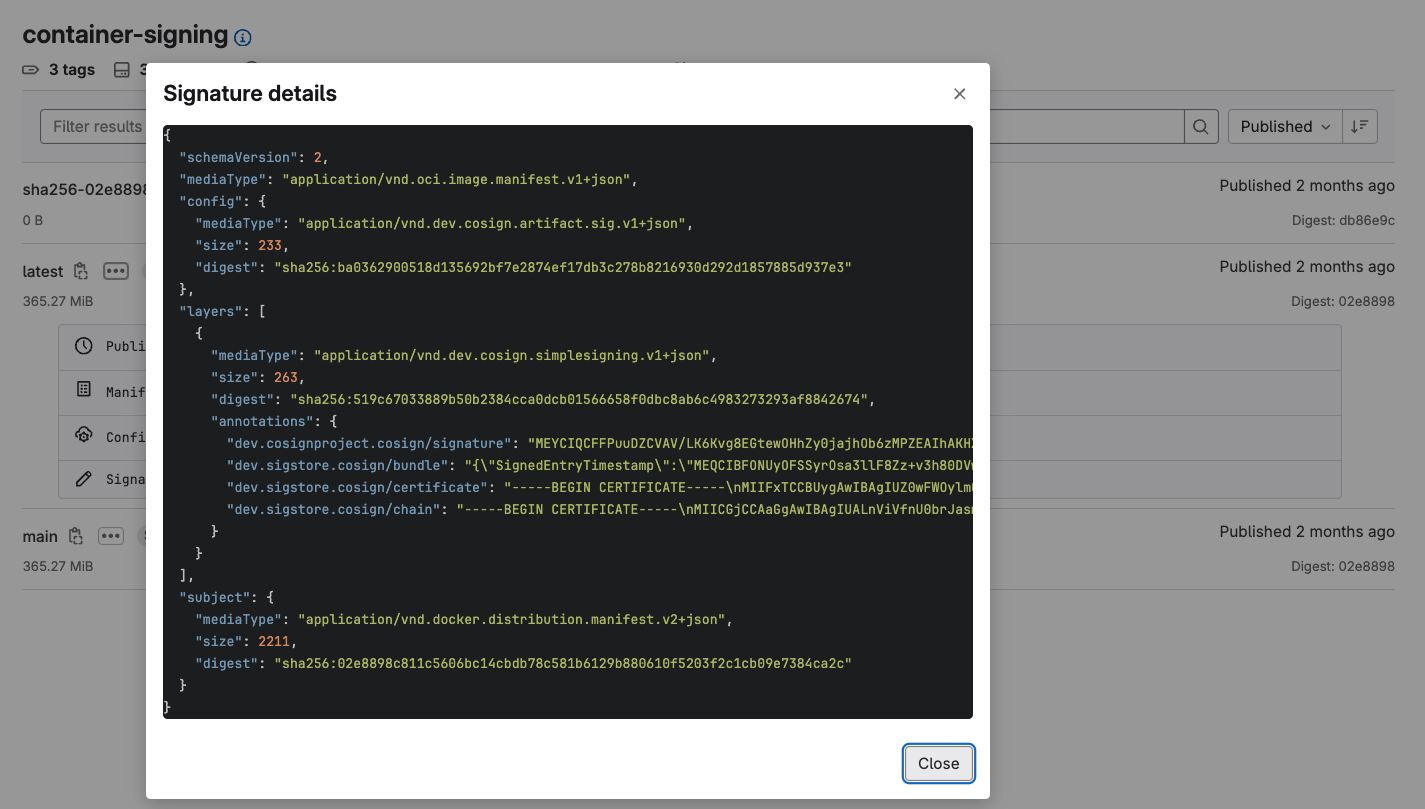
<center><i> GitLab container image signature details</i></center>
<p></p>
GitLab stores the container signature details in the container registry. A job can then be created to validate the signature against the certificate issuer using Cosign.
Vulnerability scanning and management
As you add more application dependencies to a hardened base image to achieve your goals, over time you may introduce vulnerabilities. By enabling security scanning provided by GitLab, you can address these risks as they come and reduce them. Additionally, when these vulnerabilities arise, vulnerability management tools are crucial for managing your security posture.
Vulnerability scanning and security guardrails
It’s necessary to regularly run security scans to avoid data breaches, reduce service downtime, and prevent loss of brand reputation. Some benefits of running security scans before code is deployed to production include:
- early detection and resolution
- adherence to regulatory compliance
- maintaining system uptime
- building trust with customers
- assessing and managing risk
GitLab provides several analyzers to scan various parts of your application for security vulnerabilities:
| Scanner Type | Description |
|---|---|
| Static Application Security Testing (SAST) | Scans static source code for known vulnerabilities (C/C++, Java, Python, Go, JavaScript, and many more languages) |
| Dynamic Application Security Testing (DAST) | Runs automated penetration tests to find vulnerabilities in your web applications and APIs as they are running |
| Infrastructure as Code Scanning (IaC) | Scans infrastructure definition files for known vulnerabilities (Terraform, Ansible, AWS Cloudformation, Kubernetes, and many more) |
| Container Scanning (including image dependencies and licenses) | Scans container images for known vulnerabilities, including GitLab Container Registry, external container registries, Kubernetes cluster. Container image dependencies and licenses are also scanned and compared to policy |
| Dependency Scanning and License Compliance | Scans your application’s dependencies for known vulnerabilities, including NuGet, Gradle, Maven, pip, npm, yarn, and more. Dependency licenses are also scanned and compared to policy. |
| Secret Detection | Scans your repository for secrets, such as keys and passwords. Scans all text files regardless of language or framework. Can be set to reject pushes if a secret is detected and can run in browser to warn if you are about to post a potential secret. |
| Web API Fuzzing | Sets operation parameters to unexpected values to cause unexpected behavior and errors in the API backend |
| Coverage-guided Fuzzing | Sends random inputs to an instrumented version of your application to cause unexpected behavior |
These scanners can be easily added to your pipeline by simply importing the appropriate scanner template in your .gitlab-ci.yml. For example, to enable SAST, simply add the following to your .gitlab-ci.yml:
stages:
  - test

include:
  - template: Jobs/SAST.gitlab-ci.yml
Once you’ve enabled the scanners, whenever you create a merge request to commit code from a feature branch into another branch, scanner results will display directly within the MR:
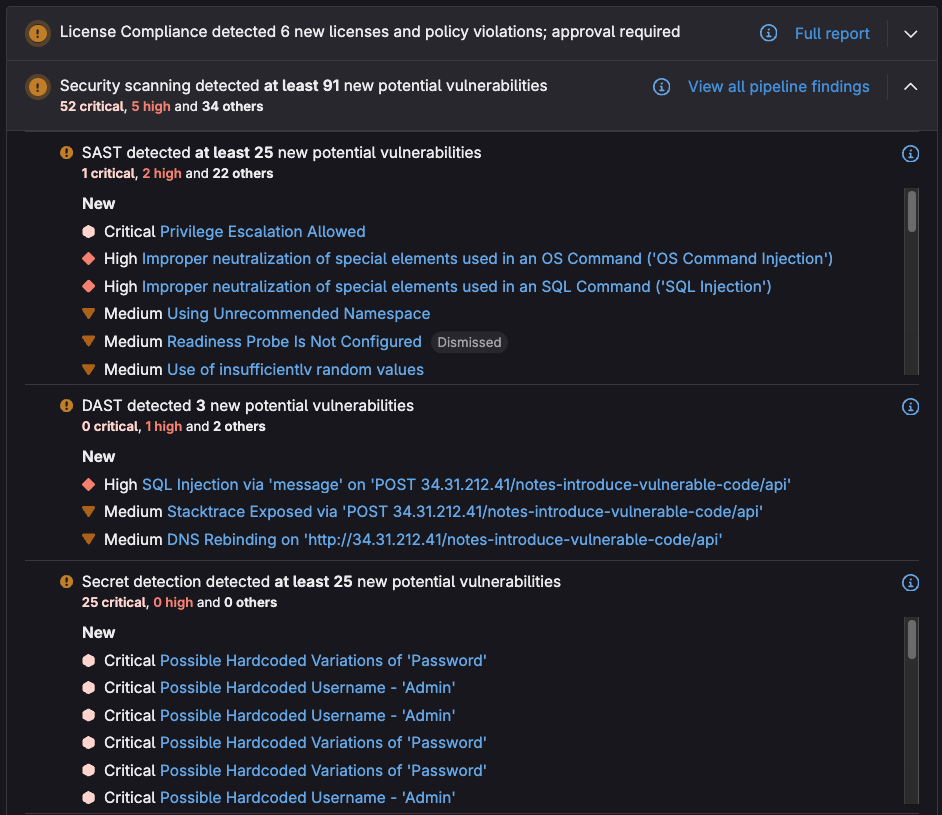
<center><i>GitLab security scanner findings displayed in MR</i></center>
<p></p>
These results allow developers to quickly assess, prioritize, and mitigate or remediate vulnerabilities by providing the following information:
- description
- severity
- location
- links and identifiers
- training
- solutions
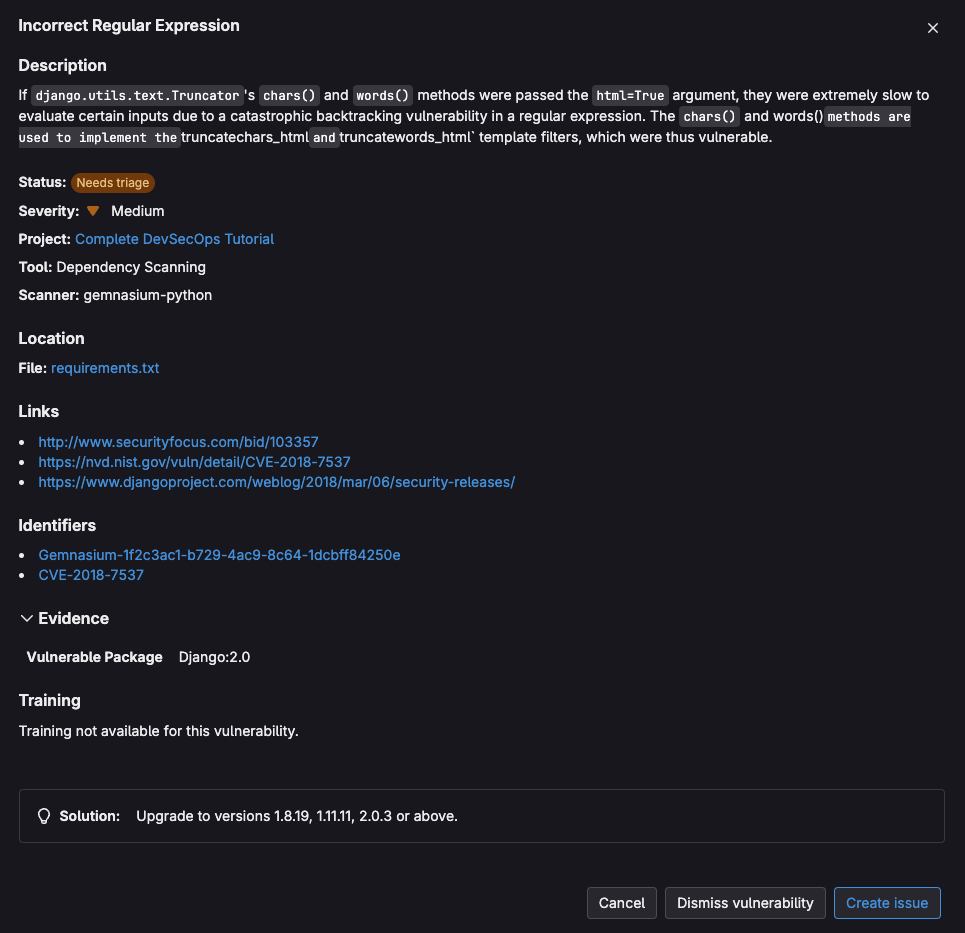
<center><i>GitLab security scanner vulnerability details</i></center>
<p></p>
Additional actions can be taken on a vulnerability, such as:
- dismissing the vulnerability and providing a reason to allow quicker review from the security team
- creating an issue to collaborate later on a resolution
Note: Scanners can also be configured and/or extended using variables and pipeline directives, just like any other GitLab job.
Security guardrails
The scanners mentioned above can be used along with security policies to prevent insecure code from being merged into production and to ensure that the scanners are run on every pipeline. GitLab provides the following security policy types:
- Merge request approval policy: Create rules that check for security vulnerabilities and license compliance before merging a merge request.
- Scan execution policy: Create rules that enforce security scans for particular branches at a certain time.
- Pipeline execution policy: Enforce a custom CI/CD configuration to run in project pipelines.
Implementing these policies ensures that when creating an MR, security scans and custom compliance jobs will be run, and that approval will be required if vulnerabilities or incompatible licenses are detected:
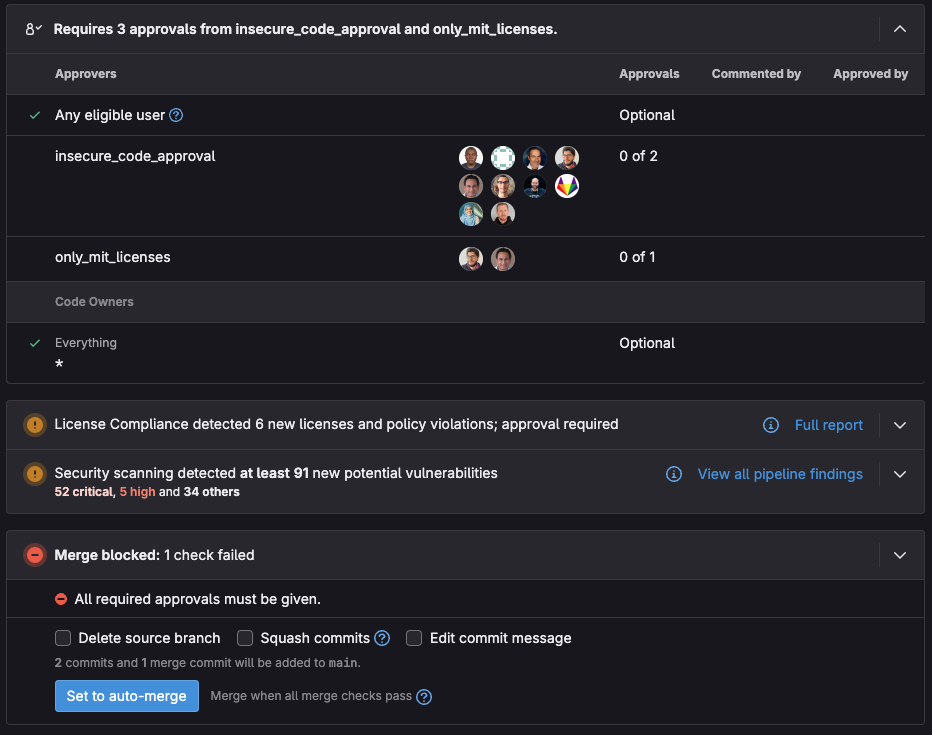
<center><i>Merge request approval required due to vulnerabilities and incompatible licenses</i></center>
Vulnerability reports
Detecting vulnerabilities before they make it to production is important, but it is equally important to determine and manage vulnerabilities that make their way into production, so that they can be mitigated accordingly.
GitLab Vulnerability Report provides information on all the detected vulnerabilities from scans of the default branch (which may be your staging or production branch):
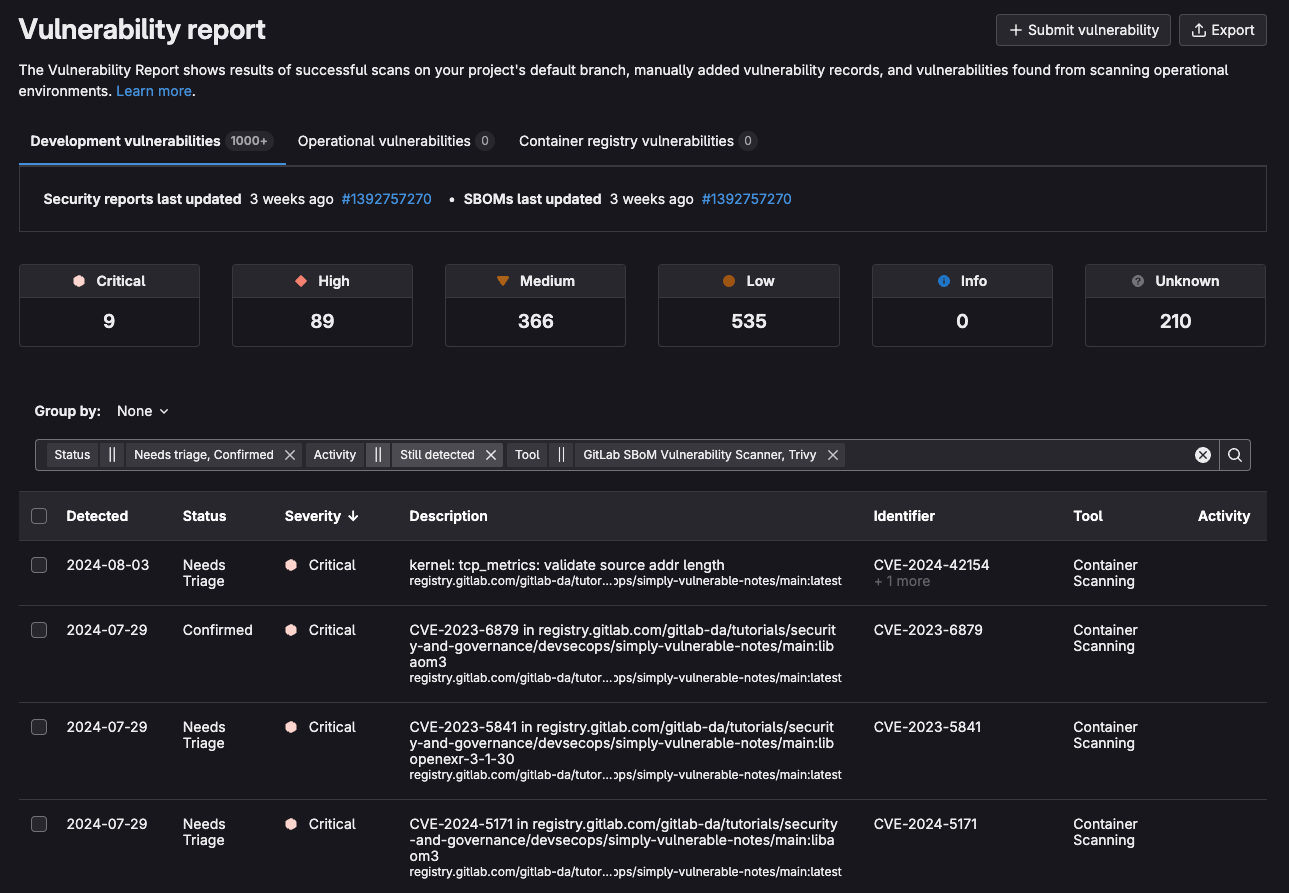
<center><i>Vulnerability report with filters applied</i></center>
<p></p>
If you select a vulnerability, you’ll be taken to its vulnerability page, which displays the same vulnerability details as you would see in the MR view. You can use this view to quickly assess, prioritize, and mitigate or remediate vulnerabilities:

<center><i>Vulnerability page for improper authorization vulnerability</i></center>
<p></p>
The security team can manage vulnerabilities by setting their status to one of the following:
- Detected: The default state for a newly discovered vulnerability.
- Confirmed: A user has seen this vulnerability and confirmed it is accurate.
- Dismissed: A user has seen this vulnerability and dismissed it because it is inaccurate or otherwise not to be resolved. Dismissed vulnerabilities are ignored if detected in subsequent scans.
- Resolved: The vulnerability has been fixed or is no longer present. If a resolved vulnerability is reintroduced and detected again, its record is reinstated and its status set to detected.
Software bill of materials
A software bill of materials (SBOM) is a comprehensive inventory that lists all the components, dependencies, and associated metadata of a software application. SBOMs are vital for organizations to effectively manage software security, compliance, and supply chain risks.
Chainguard provides high-quality, out-of-the-box SBOMs for their container images in SPDX format. The SBOM can be converted into CycloneDX format and loaded into or compared with the results of GitLab’s dependency list. The dependency list is an SBOM generated from an artifact or the results of the dependency, container, and license scanners:
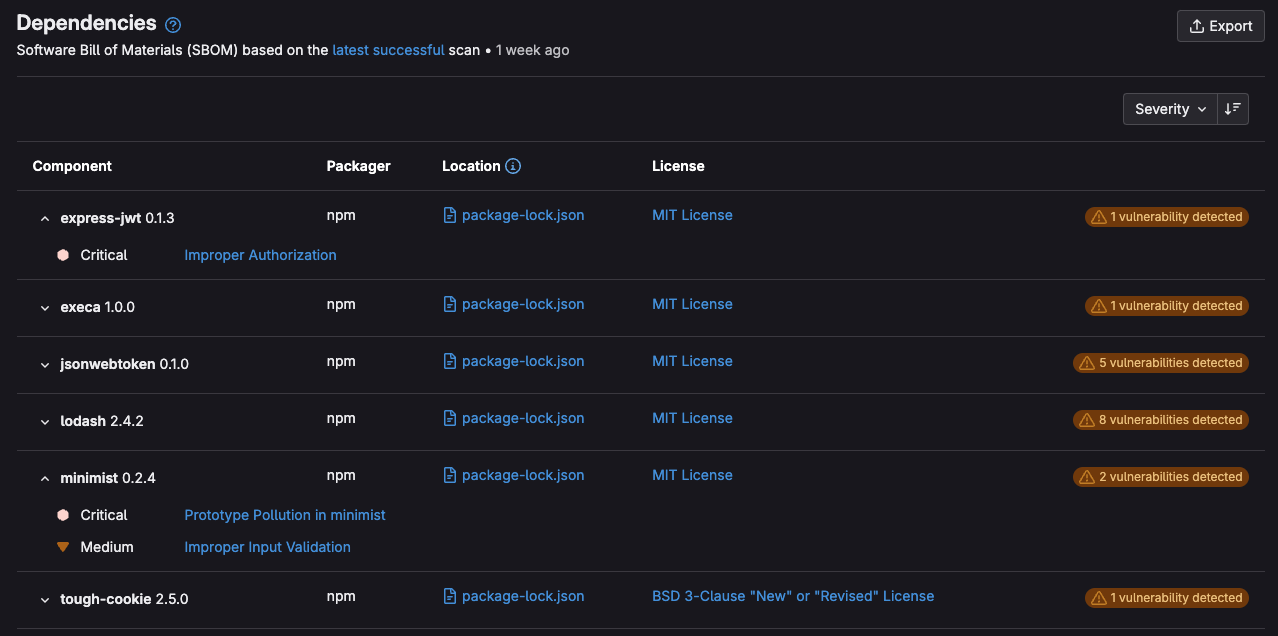
<center><i>Dependency List with some components expanded</i></center>
<p></p>
Chainguard images meet SLSA Level 2 requirements and are verified, signed, and attested with signatures. Furthermore, GitLab CI can generate and produce attestation/provenance metadata for all build artifacts. By using Chainguard with GitLab, you can prevent tampering and provide additional build integrity guarantees.
Learn more
To learn more about GitLab and Chainguard, and how we can help enhance your security posture, check out the following resources: