
As a Zabbix partner, we help customers worldwide with all their Zabbix needs, ranging from building a simple template all the way to (massive) turn-key implementations, trainings, and support contracts. Quite often during projects, we get the question, “How about making configuration backups of our network equipment? We need this, as another tool was also capable of doing this!”
The answer is always the same – yes, but no. Yes, technically it is possible to get your configuration backups in Zabbix. It’s not even that hard to set up initially. However, you really should not want configuration backups. Zabbix is not made for them, and you will run into limitations within minutes. As you can imagine, the customer is never happy with this limitation, and some actively start to question where we think the limitation is to see if it is a limitation for them as well. So we simply set up an SSH agent item and get that config out:
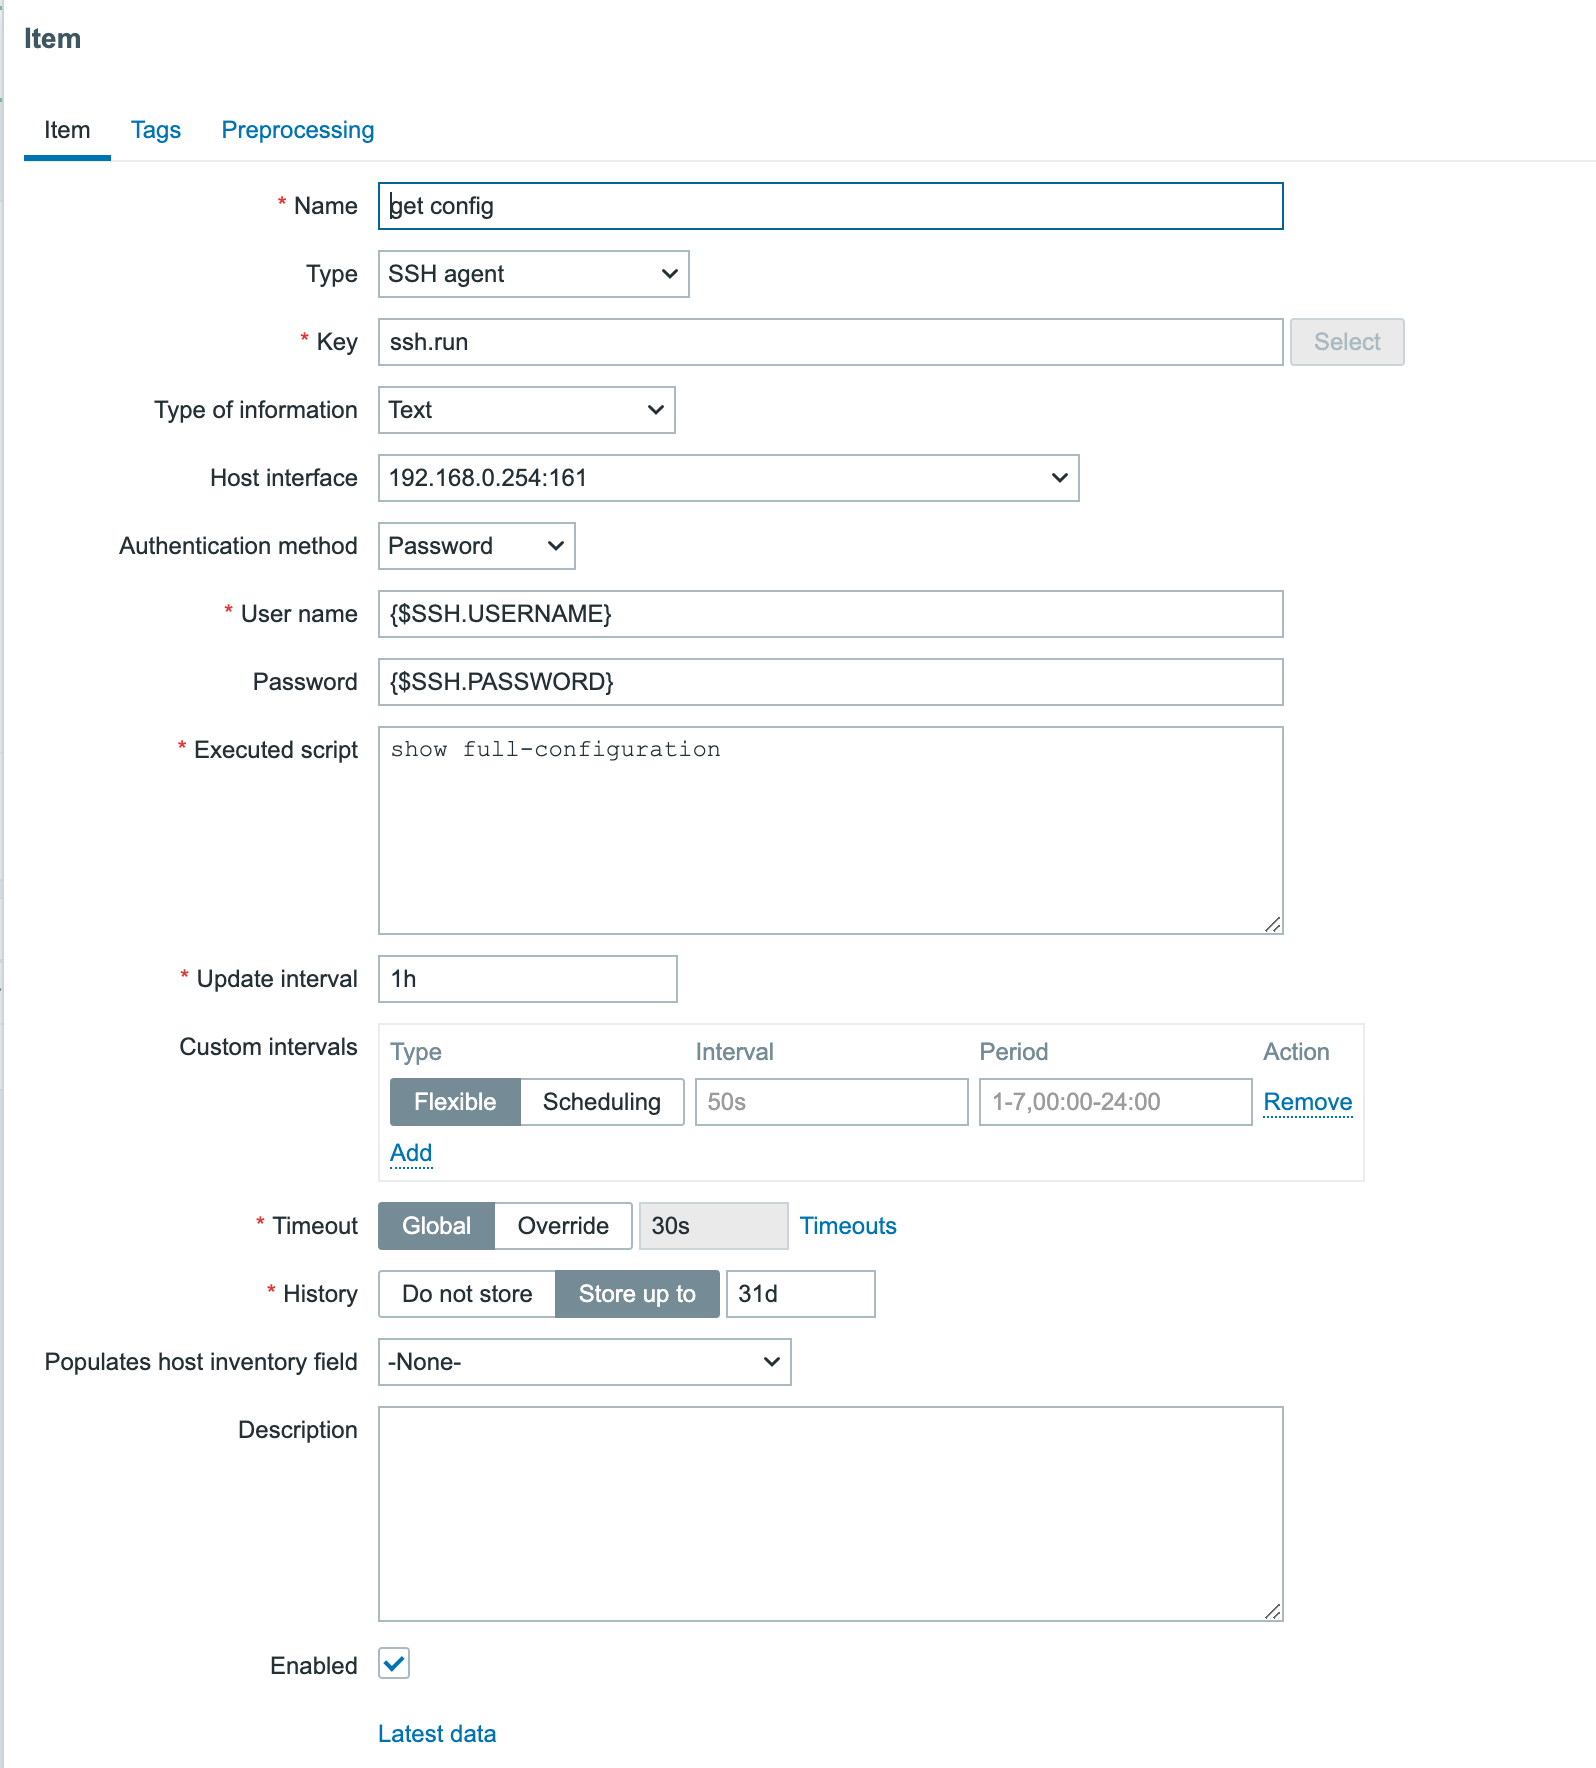
Voila! Once per hour Zabbix will log in to that device, execute the command ‘show full-configuration,’ and get back the result. Frankly, it just works. You check the Monitoring -> Latest data section of the host and see that there is data for this item. Problem solved, right?
No. As a matter of fact, this is where the problems start. Zabbix allows us to store up to 64KB of data in a item value. The above screenshot is of a (small) fortigate firewall and the config if stored in a text file is just over 1.1MB. So, Zabbix truncates the data, which renders the backup useless – restore will never work. At the same time, Zabbix is not sanitizing the output, so all secrets are left in it.
To make it even worse, it’s challenging to make a diff of different config versions/revisions – that feature is just not there. Most of the time, the customer is at this point convinced that Zabbix is not the right tool and the next question pops up – “Now what? How can we fix this?” This is where our added value is presented, as we do have a solution here which is rather affordable (free) as well.
The solution is Oxidized, which is basically Rancid on steroids. This project started years ago and is released under the Apache 2.0 license. We found it by accident, started playing around with it, and never left it. The project is available on Github (https://github.com/ytti/oxidized) and written in Ruby. Incidentally, if you (or your company) have Ruby devs and want to give something back to the community, the Oxidized project is looking for extra maintainers!
At this point, we show our customers the GUI of Oxidized, which in our case involves just making backups of a few firewalls:
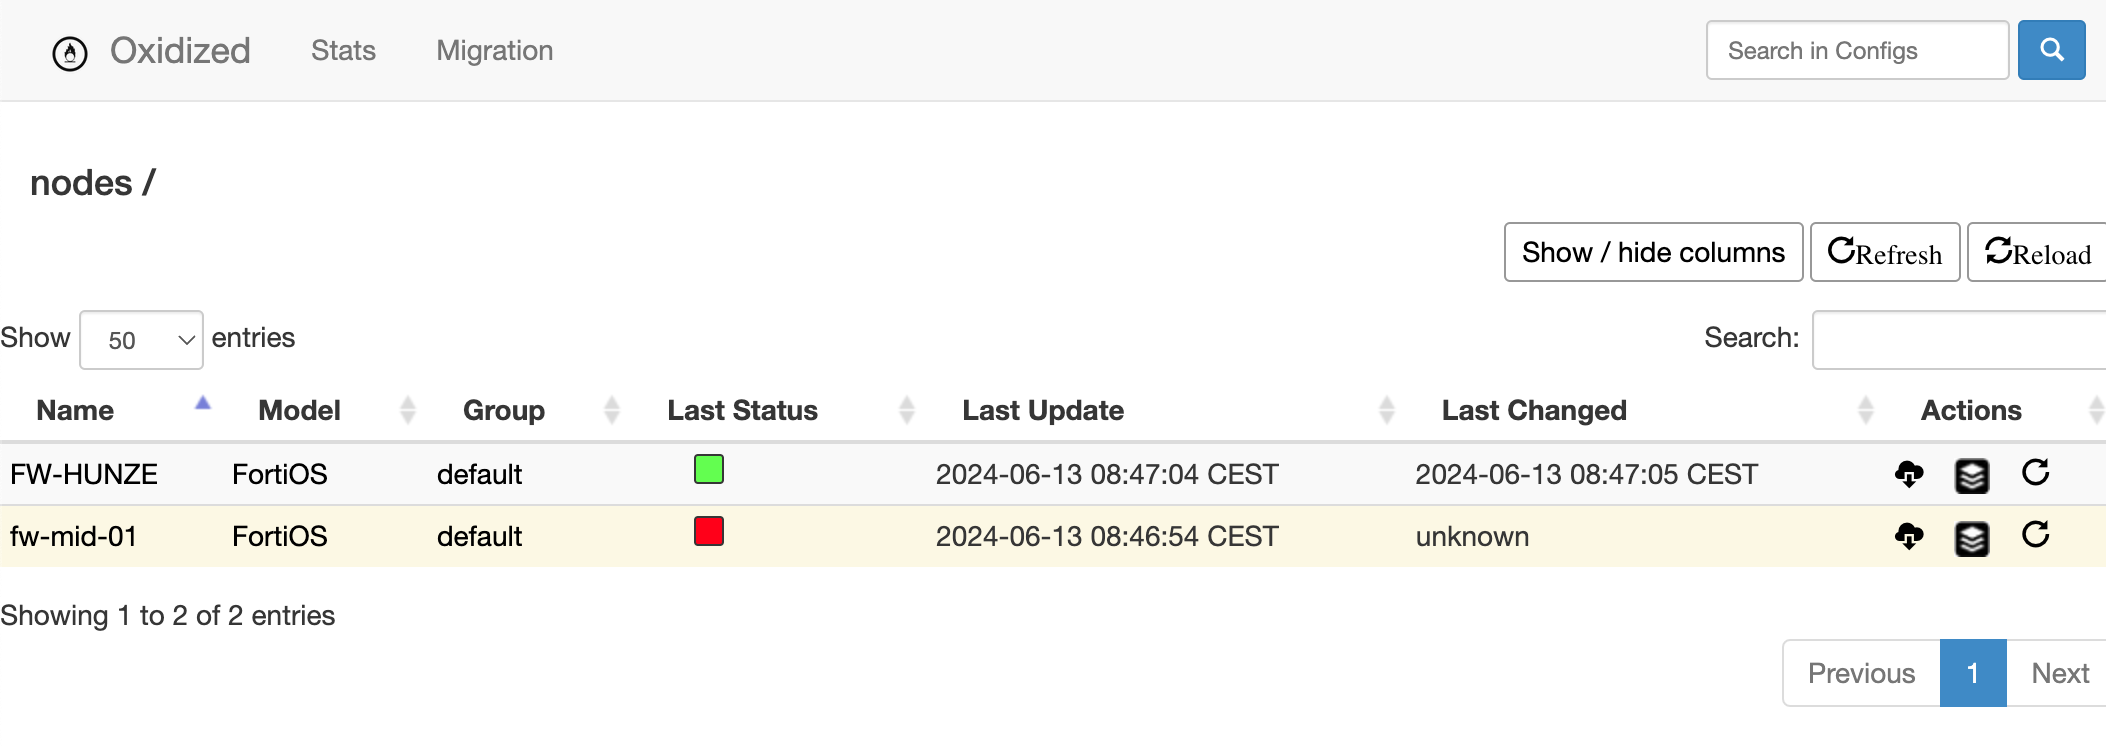
So we have the name, the model, and (in this case) just one group. The status shows whether the backup was successful or not, the last update and when the last change was detected. At the same time, under actions, we can get the full config file, look at previous revisions(and diff them) combined with a ‘execute now’ option.
Looking at the versions, it’s simply showing this:
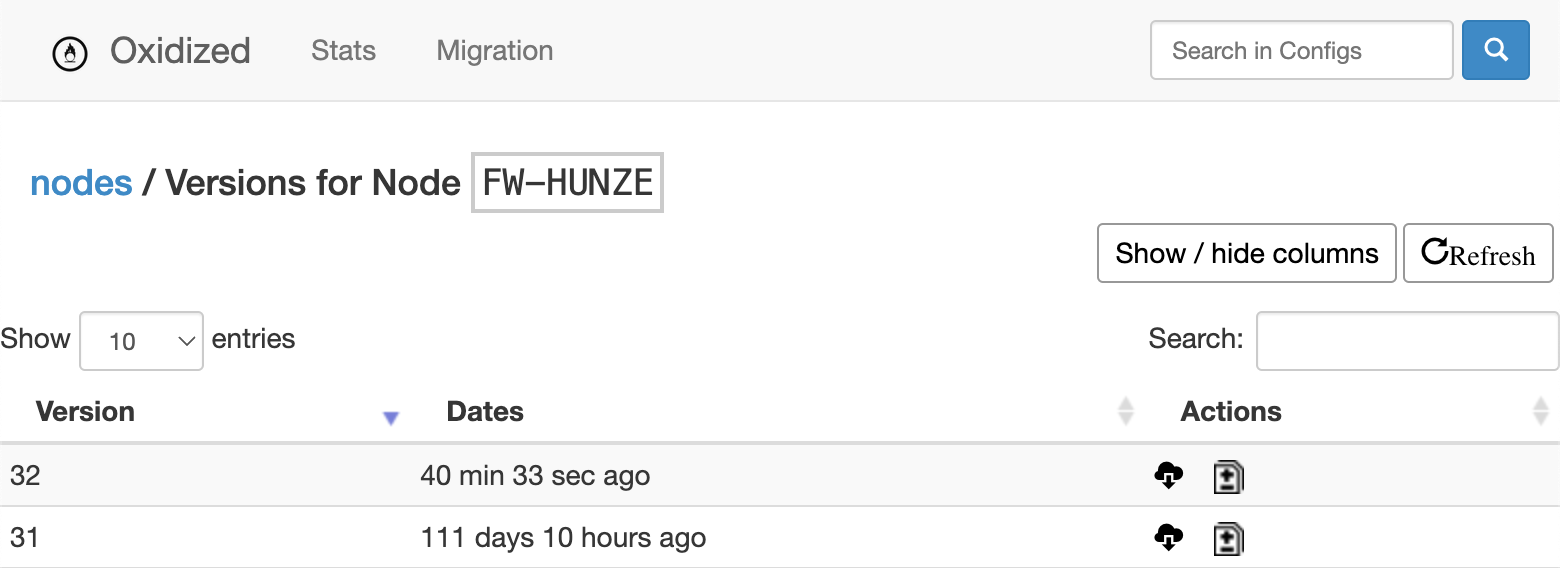
This is already giving us a nice idea of what is going on. We see the versions and dates at a glance, but the moment we check the diff option, we can easily see what was actually changed:
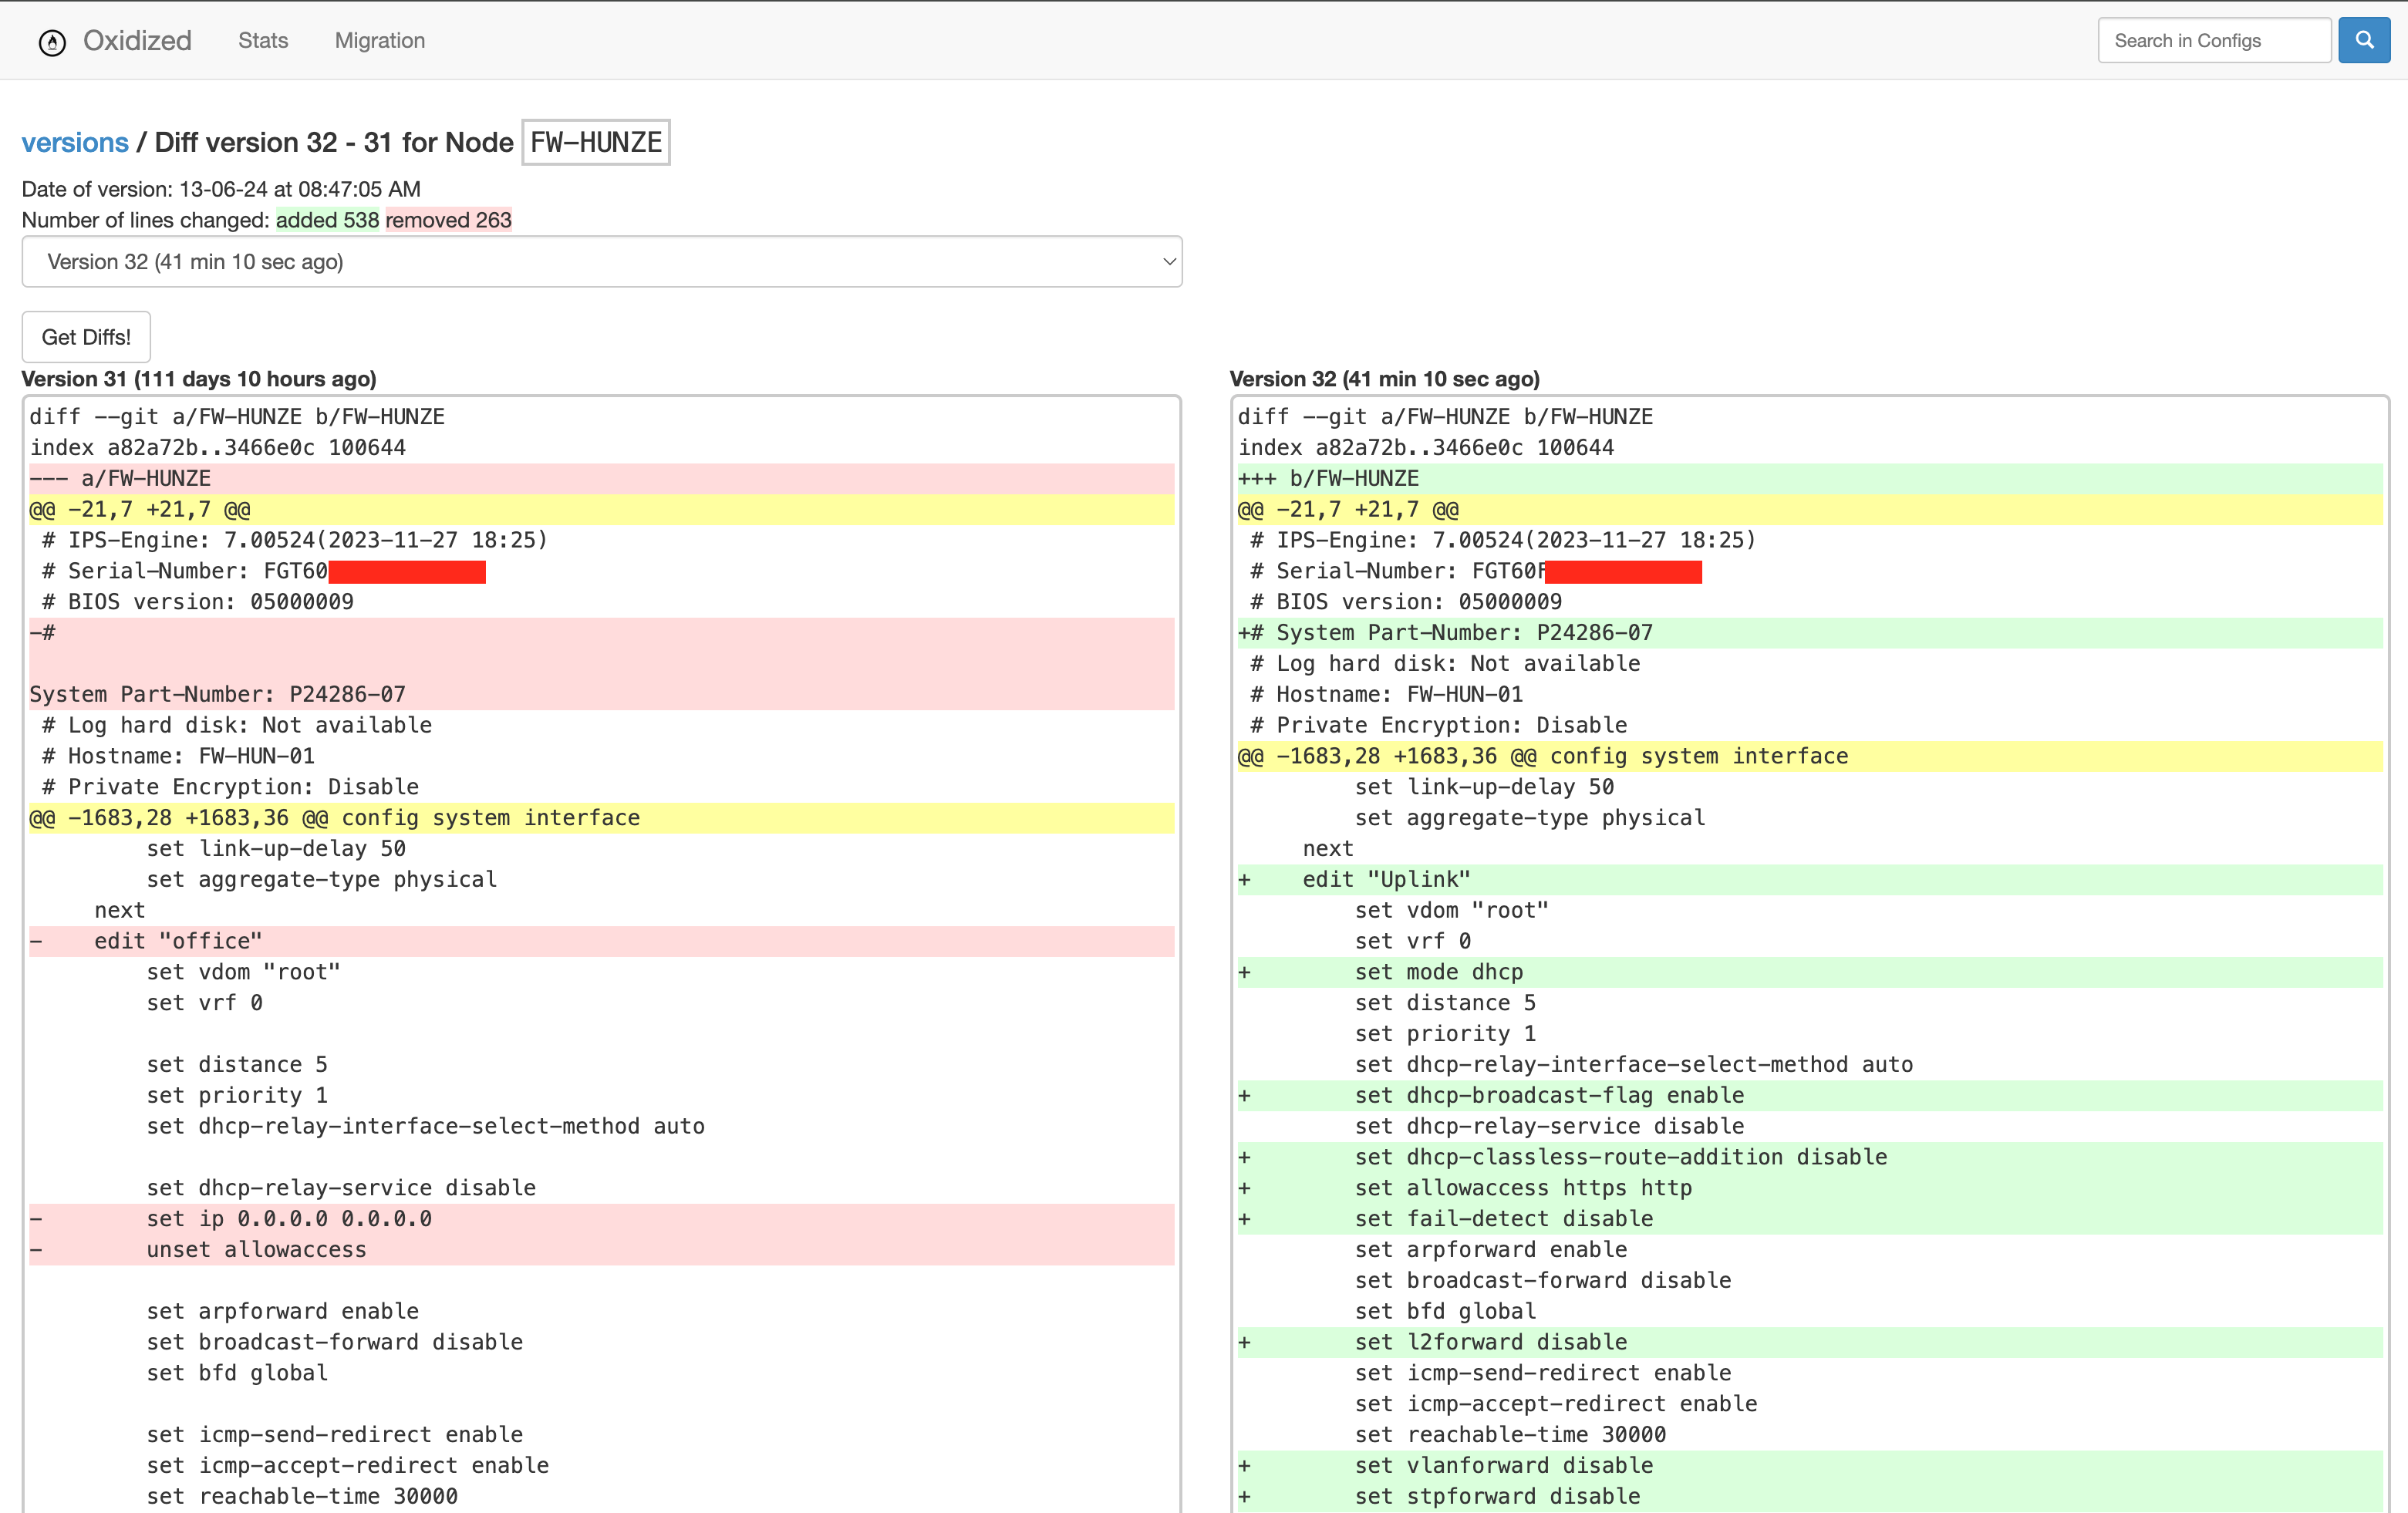
The perfect solution, except that it is not integrated with Zabbix. That means double administration and a lot of extra work, combined with the inevitable errors – devices not added, credential mismatches, connection errors, etc. Luckily, we can easily change the format of the above information from GUI to json by just adding ‘.json’ at the end of the url:
http://<IP/DNS>:<PORT>/nodes.json
This will give the following output:
[
  {
    "name": "fw-mid-01",
    "full_name": "fw-mid-01",
    "ip": "192.168.4.254",
    "group": "default",
    "model": "FortiOS",
    "last": {
      "start": "2024-06-13 06:46:14 UTC",
      "end": "2024-06-13 06:46:54 UTC",
      "status": "no_connection",
      "time": 40.018852483
    },
    "vars": null,
    "mtime": "unknown",
    "status": "no_connection",
    "time": "2024-06-13 06:46:54 UTC"
  },
  {
    "name": "FW-HUNZE",
    "full_name": "FW-HUNZE",
    "ip": "192.168.0.254",
    "group": "default",
    "model": "FortiOS",
    "last": {
      "start": "2024-06-13 06:46:54 UTC",
      "end": "2024-06-13 06:47:04 UTC",
      "status": "success",
      "time": 10.029043912
    },
    "vars": null,
    "mtime": "2024-06-13 06:47:05 UTC",
    "status": "success",
    "time": "2024-06-13 06:47:04 UTC"
  }
]
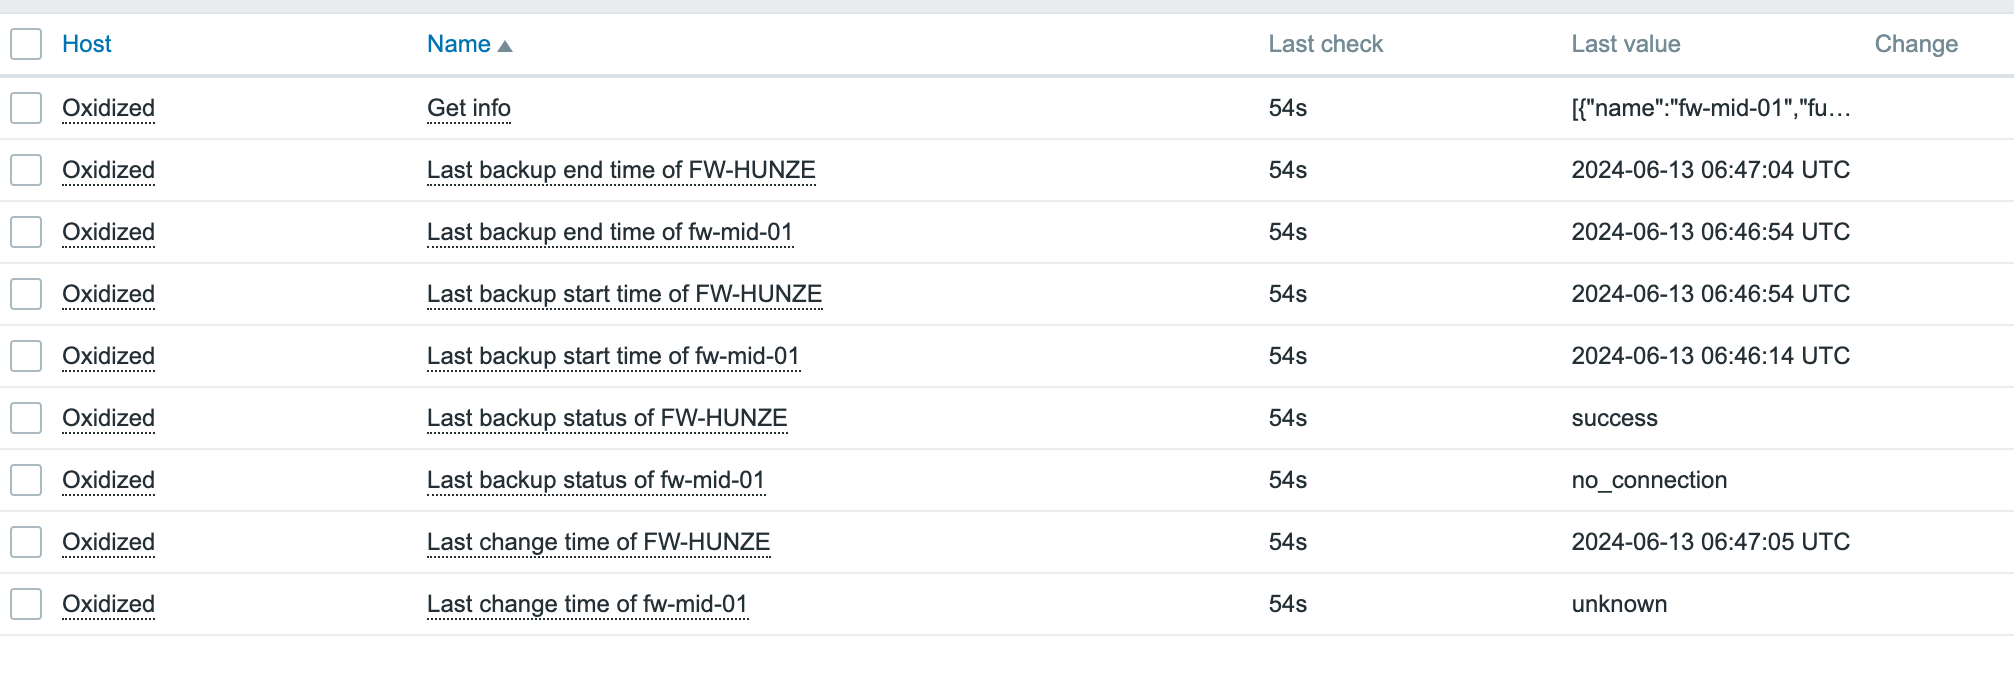
As you might know, Zabbix is perfectly capable of parsing json formats and creating items and triggers out of them. A master item, dependent lld (https://blog.zabbix.com/low-level-discovery-with-dependent-items/13634/), and within minutes you’ve got Oxidized making configuration backups while Zabbix is monitoring and alerting on the status:
At this point we’re getting close to a nice integration, but we haven’t overcome the double configuration management yet.
Oxidized can read its configuration from multiple sources, including a CSV file, SQL, SQLite, MySQL or HTTP. The easiest is a CSV file – just make sure you’ve got all information in the correct column and it works. An example:
Oxidized config:
source:
  default: csv
  csv:
    file: /var/lib/oxidized/router.db
    delimiter: !ruby/regexp /:/
    map:
      name: 0
      ip: 1
      model: 2
      username: 3
      password: 4
    vars_map:
      enable: 5
CSV file:
rtr01.local:192.168.1.1:ios:oxidized:5uP3R53cR3T:T0p53cR3t
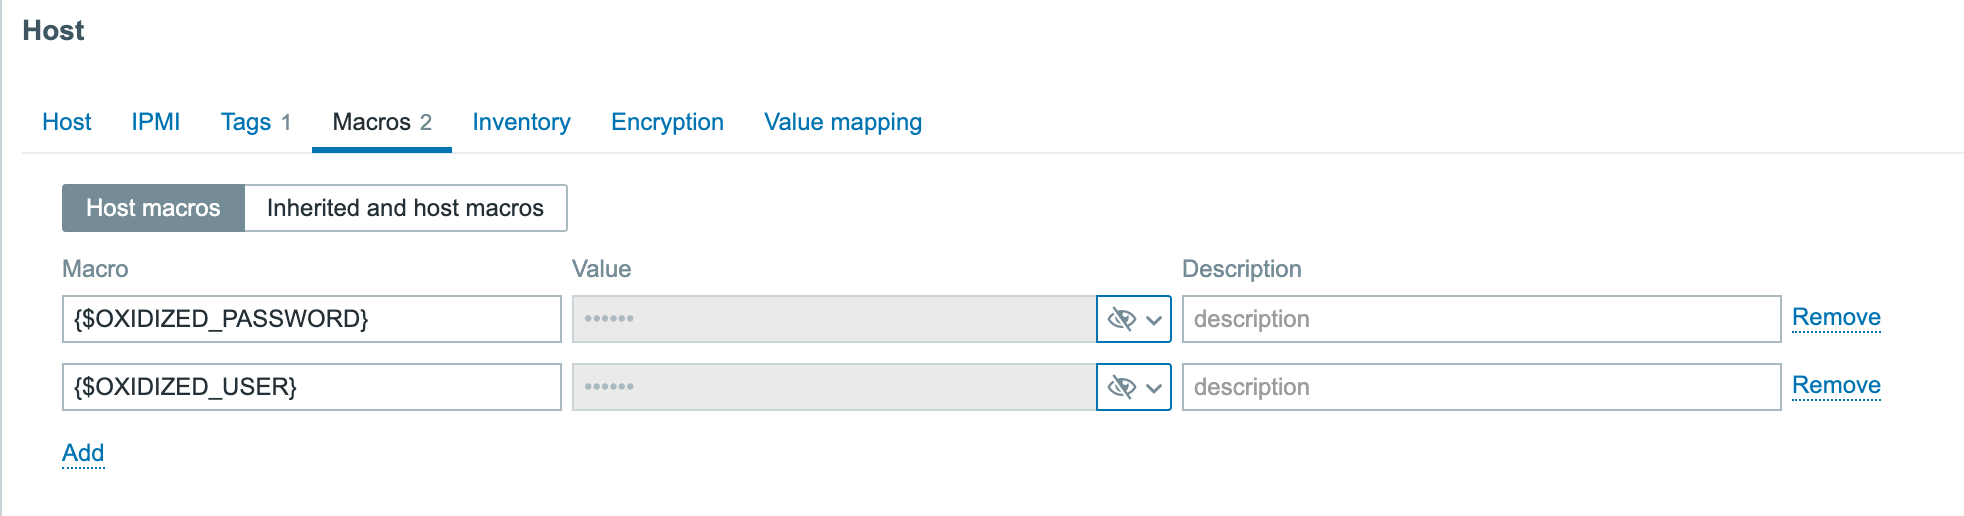
Great, now we have to configure 2 places (Zabbix and Oxidized) and get a username/password cleartext in a CSV file. What about SQL as a source, and letting it connect to Zabbix? From there we should be able to get information regarding the hostname, but somehow we need the credentials as well. That’s not a default piece of information in Zabbix, but UserMacros can save us here.
So on our host we add 2 extra macros:
At the same time, we need to tell Oxidized what kind of device it is. There are multiple ways of doing this, obviously. A tag, a usermacro, hostgroups, you name it. In order to do this, we place a tag on the host:
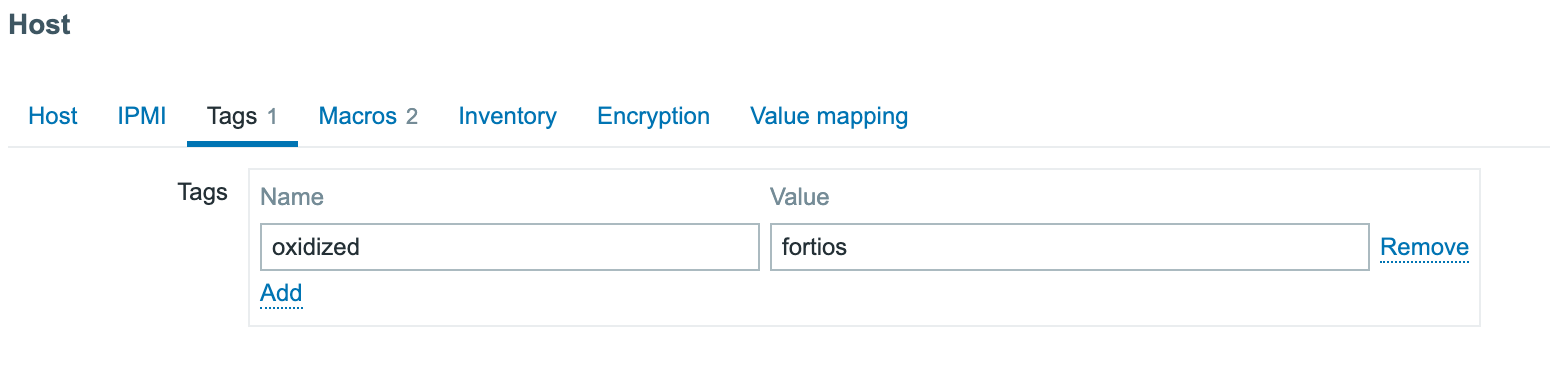
Now we make sure that Oxidized is only taking hosts with the tag ‘oxidized’ and extract from them the host name, IP address, model, username, and password:
+-----------+----------------+---------+------------+------------------------------+
| host      | ip             | model   | username   | password                     |
+-----------+----------------+---------+------------+------------------------------+
| fw-mid-01 | 192.168.4.254  | fortios | <redacted> | <redacted>                   |
| FW-HUNZE  | 192.168.0.254  | fortios | <redacted> | <redacted>                   |
+-----------+----------------+---------+------------+------------------------------+
This way, we simply add our host in Zabbix, add the SSH credentials, and Oxidized will pick it up the next time a backup is scheduled. Zabbix will immediately start monitoring the status of those jobs and alert you if something fails.
This blog post is not meant as a complete integration write down, but rather as a way to give some insight into how we as a partner operate in the field, taking advantage of the flexibility of the products we work with. This post should give you enough information to build it yourself, but of course we’re always available to help you or just build it as part of our consultancy offering.
The post Monitoring Configuration Backups with Zabbix and Oxidized appeared first on Zabbix Blog.